I have now finished this module and all that remains is to pack everything up to send it off for assessment.
My next module is Ideas and Processes, I have a new blog for that here
https://betterwithideasandprocesses.wordpress.com/
I have now finished this module and all that remains is to pack everything up to send it off for assessment.
My next module is Ideas and Processes, I have a new blog for that here
https://betterwithideasandprocesses.wordpress.com/
Here are my thoughts on the written feedback received from my tutor on my work for Assignment Five.
Positive
Well researched, technically though body of work
Solid body of technical research
Research has been one of the areas I wanted to improve in this module and these comments show that I am doing that.
Improvement in drawing work , colour filling the page not just line and mark
I tried to work on larger surfaces for this assignment, up until now my drawings had been quite small. Working on single sheets of paper, rather than on pages fixed in to a book has allowed me to work on two or three drawings at a time and produce larger items.
Systematic approach has given a good range of prints
This way of working can detract from my work from time to time as I feel I have to try every possible combination of materials in a single method, but it has produced a large volume of work here giving a varied range of prints. It also allows me to fine tune any methods used so that they are reproducible.
Allowed the research to guide development towards final item
I had no clue what my final item would be when I started this work so it was interesting to see where my work ended up. I have not worked like this before, previously always thinking about how the finished item would be presented and then working back from that.
Interesting range of samples developed
My improved research has helped enormously here, the examples I found during the research phase have informed the items I have produced throughout this assignment.
Good repeat evident in printed fabrics
I am glad that this comment has been made. I put in quite a bit of time to producing a printing method that would work well on to fabric surfaces and am happy to see that this has been recognised here.
To think about
Simple bags lack the sculptural surface of the plaster cubes, could have pleated or pinned fabric
I did do some work on manipulating the fabric surface of the bags but dismissed that after a few experiments. Had I researched this further it may have improved the appearance of the final items produced. However I am still happy with the items I have made and feel that they have built upon the plaster ice cubes made earlier in the course, as I had intended.
To work on
More drawing needed, use to develop ideas
I have included much more drawing in this assignment than any of the previous ones so there is something to take from that, however I need to try to incorporate it in to my work more. I write a lot about my work but could try to include sketches and thumbnails instead of text to illustrate how my ideas are evolving.
Learning log notes focus on technique rather than overall success of design
Extend notes about technical aspects in to evaluations
Both comments above are fair. I find the technical aspects of my work very interesting, such as improving my printing method for collagraph plates on to fabric surfaces. I need to find more of a balance between the technical and aesthetic properties of my work.
Include more thoughts about how you feel about samples and which work you felt was strongest
More detail about items discarded during sorting stage
Demonstrate decision-making more clearly
No discussion of thematic concerns
All four comments above really come down to one thing. I probably do all of these but don’t write them down. Where I have tried to document my work more thoroughly by including more photographs I now need to try to include more detailed description of my method and include more written notes on my thinking at each stage of a project.
I have really enjoyed this module and feel that it has given me the basis of a method I could apply in generating future work.
Stage Seven – Reflection
Part Five
I am very pleased with the final outcome from the stage six prototype fabric cubes. These are not a finished item as they could easily be added to by producing more cubes and from more collagraph printed fabrics. There were many combinations of plates I could have used to print the fabric samples and when adding in different colour combinations that number increased again, rapidly. In previous work I think I have tried to try every combination of some things ‘just in case’ I miss a good one but for this work I was conscious of that and so tried to limit myself by just producing twelve fabric pieces. Some would work and others not so well but by placing these limitations on my work I could focus on the technique being used and not try to pre-empt the finished items.
I am very glad that I managed to produce a reliable and not greatly complex method for printing fabric collagraph plates on to fabric surfaces. There was very little information easily available regarding this sort of method so I began by printing on to paper and then transferring the results of those print tests to fabric. This gave some poor results at first but after some seemingly small adjustments the print quality improved and I produced some very detailed prints.
Much of my drawing work to date had been produced only on to white background and in no more than A4 in size. The printed fabrics produced in part six were a minimum of A3 in size and were, in half the samples, on to coloured surfaces. This is quite a departure from my usual work and I am very glad that I tried to introduce some of the colours from the colour palettes produced in Adobe CC in this way rather than relying on the acrylic paint used only.
I produced a good amount of research for Part Five and in some ways I think it was a bit too much. I really enjoyed the items I found but I feel that there were too many to include all of them in this work. I had done some work with screen-printing but felt that this did not fit in to the final pieces made as the collagraphs had worked well enough by that point.
One of the best things to come out of my research was to review any prints made the day after they had been produced. This was especially true of the part three test prints. These had not been as crisp or detailed as I had hoped while I was making them. I wouldn’t ever have thrown them away but by stepping away from these prints overnight, they really weren’t as bad as I had remembered when I returned to them the next day. These then formed the basis of my review of my prints in part three and the improvement of my method to finally print well on to fabric.
The hardest part of part five was not knowing what was really required for this work. I had little clue about whether making an actual item was required or if just the idea for a finished item would be sufficient. There were a few blog posts on the OCA site that came at just the right time. I then chose to focus on the printing method to lead my work. By trial and error I produced some reasonable samples and took these forward to make my final printed fabrics and the fabric cubes.
The cubes were a good way of displaying the fabric made and they did fit with the idea of the plaster cubes previously produced. These are by no means finished. I had hoped to make twenty but only made 14, more fabric could be produced and more cubes assembled, but this number gives a good indication of what I was trying to achieve.
I am however pleased with my use of fabric in these cubes. By under-stuffing each cube the fabric has folded itself to replicate the peaks and valleys seen in the plaster cubes.
While my printing method has been successful I am not sure that it is particularly useful outside of an experimental setting. The plate will breakdown over time and changes in the print achieved can be seen every time it is used. These changes come from how they are inked due, the amount of paint applied, pressure applied to the plate to print it or the fabric surface it is printed on.
Whole Module
This module, Mixed Media (MM) has been quite different to the Textile Vocabulary (ATV) module I first studied. There were many times in MM when I was unsure where the work was leading. I found myself second guessing what the outcome of exercises was supposed to be or what might be the possible reason for doing some of the exercises even was.
The trick here was to stop second guessing and just take pleasure in the completion of each exercise and the making of the items to complete each assignment. I didn’t enjoy working like that. It seemed that I was ticking boxes in order to move on to the next exercise. There was some detail in the course notes as to why these exercises had been chosen but a little more explanation as to what we should be getting out of each part of the course would have been useful.
I enjoyed the printing in part four most and then the collagraph printing on to fabric in part five. I really got to understand these methods and have produced some good items in these sections of work, extending my understanding greatly in part five alone.
The work I have produced in this module is very varied. I’m not sure where it fits in my future work but I have come across some techniques such as wrapping items and casting that I might never have come across by myself.
As for my own working practices, I think that I have begun to extend my drawing skills and my use of colour but still need to look at working larger than A4. The amount of research I have produced for each section of work has also increased from that produced in ATV, too much in some cases in that I can’t fit it all in to the resulting work to be produced. I have enjoyed finding out about new techniques and artists that I would otherwise maybe not have come across.
Overall this module wasn’t what I was expecting from the title and strayed about as far away from textiles as I could imagine, however I managed to work some fabric and stitching back in there at the end and have gained some new techniques that should come in for future work.
Assessment Criteria
Demonstration of technical and visual skills
I focused, perhaps a bit too much, on my printing technique in part four. Possibly to the cost of the items produced. But this in-depth investigation of the techniques proved very valuable in part five where I was able to apply that knowledge to produce a reliable method to print collagraph plates on to fabric.
I feel that my drawing skills are improving, especially using smaller thumbnail sketches to illustrate how items could be put together rather than having to produce each item and my work is beginning to become a little bis larger.
Quality of outcome
I have tried to present my work in such a way that it combines everything I have produced for a section of work together but also that it is a reference that I can return to later. Many of the techniques in this module were unknown to me so the samples produced are my first attempts in most cases. These will be the basis for building on these techniques if they are used in future so it is in my interest to keep these samples in a clear and coherent fashion so that I can review them easily in the future.
My blog includes many more photographs this time around, although at a lower resolution, and I have tried to approach adding entries in a logical manner, following the course notes where possible.
Demonstration of creativity
I have enjoyed producing the samples for this module, especially as many of them have been quite experimental for me. I had not used many of these techniques before so some of my samples began in a very simplistic way but I feel that I have expanded on those techniques well especially the wrapping samples and the print samples.
Context
During the ATV module it was noted that I did not provide enough research for each part of the course. I think that I have made good strides here in researching more than only the suggested topics in the course notes and have tried to look outside of textile artists only in order to find other avenues to inform my work. Clearer links can be seen through my research to my finished items and these have been highlighted in my blog posts where necessary.
In this stage of work I have tried to bring together the collagraph printing method I have refined for fabric printing along with producing a greater amount of smaller items in the style of many modern installations.
Colour selections were taken from the earlier work done in Adobe CC from a drawing made earlier in the course.


I found these colours a little too light so have darkened them slightly. Actual paint used in final picture above, excluding gold.
Collagraph plates
I had already produced a number of collagraph plates from the drawings made from the plaster ice cubes. These had printed well in my test samples so for this final work I combined these plates to produce more complex prints.
Four extra plates were produced using hand stitching. It was possible to print the individual thread of the fabric samples so I wanted to continue testing the printing method on hand stitched sample plates.
Fabric printing
So far I had only printed up to A4 in size. For these pieces I chose to print on to fabric that was greater than A3 in size. This is a small step up but is a giant leap for my work as I find even A4 quite hard to get to grips with when drawing or printing.
I had used a board covered in fabric to print my previous work but this was not large enough to print these fabric pieces. Instead I covered my table with towels and covered these with a plastic sheet. To prevent the sheet and towels from moving they were taped to the underside of the table. This surface gave the spring required for the fabric to sink slightly into the printing surface to give a good print.
The fabric used was made damp before being printed on. This was achieved by spraying the surface with cold water from a plant spray bottle. Enough water was added to the surface to make the fabric surface appear darker. This was left to settle in to the fabric for five minutes so that no standing water was on the fabric surface. The fabric did not need to be wet, just damp, so leaving the water to absorb gave the most receptive surface for printing on to, it also prevented too much water being present on the fabric surface and the printed image running.
Overprint two/three plates
I had only printed each collagraph plate individually in my sample work, except for the final fabric piece in my notebook. The test prints made were to trial the surfaces that were being printed from, whether the details of the fabric scraps on the collagraph plates could be transferred to the printed fabric surface or if an individual stitch could hold enough paint to make an identifiable mark on the finished print.
As these tests had gone well I chose to make the final piece in my notebook by printing two plates, one over the other. This gave a much more interesting finished print as there were more things to look at without the print feeling too busy. I have extended this idea by printing several larger fabric samples using two different collagraph plates over each other.
Stamps and gutta resist drawn directly on to fabric were also used to produce fabric samples.
The above printing methods may well have been enough to satisfy the requirements for this part of the course but I chose to use the printed fabric made to make some stuffed fabric cubes, representative of the plaster ice cubes made previously. The plaster cubes, when made out of plaster of Paris had a very soft quality, so I didn’t think it was too big a leap to make a fabric equivalent.
For these fabric cubes I had envisaged that they would be larger than the original plaster cubes but that they could be viewed together and not as individual items. In part five I had suggested that 20 cubes could be made at around 4 ½ inches. This was not a set figure and the fabric produced would influence the final size and number of cubes produced for the finished piece.
Fabric samples produced
Twelve fabric pieces were printed using a combination of collagraph plates, stamps and gutta. Six pieces were printed on white and six on coloured fabric.
Acrylic paint and textile medium mixed (1:1) was used throughout. Paint was applied to the plates and stamps using a sponge roller.
One


Blue polycotton, pearl white and buff acrylic paint.
Hand stitched plate printed in rows across the fabric, pizza base added but offset, this allowed some of the first print to remain visible.
A safe start. The second and third prints of the hand stitched plate gave good muted images and the pearlescent paint added some interest to the white printed layer.
Two


Blue polycotton, pearl white acrylic paint.
Printing from air-drying clay was one of the ideas I’d had earlier in the course after making small textured tiles in part three. The tile above was made by rolling a plaster ice-cube along its surface. This printed well on to fabric. Once the clay had dried it was not so stiff that it would break if pressure was put on it which made it ideal for using under the rolling pin in this method.
Tile adhesive was used to produce the other plate. It was drawn in to once it had partially dried. This material gave a very even toned print and the plate was very robust so could be used repeatedly without deteriorating.
Three


Gold satin, buff acrylic paint.
Gold, shiny satin was a huge departure for me. I have kept to very plain fabric and mostly blue, black and white in almost every other part of this course. I was really surprised how well this fabric received the paint and how much detail was transferred to the fabric from the fabric plate. This plate had been one of the worst on to paper in part three and had given a very bad print on to fabric as the test piece had been far too wet, so to get this print here was very pleasing.
It is very difficult to photograph satin, I have now found. The detail photograph shows how well the print has taken to the satin but what can’t be seen is the damask like quality that the shiny surface and the matt paint together has achieved.
My plan for this work was to overprint different plate but for this sample I didn’t feel that anything else could be added to this print by any other plate.
The plate was not made to tessellate and so it doesn’t fit exactly together but the surface print is busy enough that any slight overlaps are lost in the finished image.
Four


Gold satin and winsor blue and buff acrylic paint.
After the revelation of printing on to satin above I used a second piece with this much larger image. Again, much of my previous work has been made up of very small images so this again is something a bit different for me.
The DAS air-drying clay was used as a first layer on this print. This again gave a damask like effect that was then visible through the unprinted areas of the larger image above. This print was already quite bold but by using the blue acrylic paint it becomes even more impressive.
The gold of the fabric has made the final print a little more green than blue which shows how this sort of colour mixing should be considered when using coloured fabrics as a base.
Covering the surface of the fabric with this bold image has resulted in a very busy print. Spaces could have been left between each print but I think that this would have detracted from the impact of each image being pressed up against the next.
Five


Light brown polycotton, powder blue and yellow ochre acrylic paint
The hand stitched, seed stitch, plate was used on this brown fabric first. Powder blue acrylic was used for that print but dried much lighter than it had appeared when wet so is not immediately visible underneath the yellow overprint.
This overall combination is very light and doesn’t view well from far away.
Previous prints have become more than the sum of their individual parts but in this print both images seem to have been lost on the fabric surface.
Six


Light brown polycotton, winsor blue and yellow ochre acrylic paint
As the plate made of fabric shapes had worked so well on the satin print I thought I’d try them again on the polycotton fabric. Again, they proved to work well, but this time the overprinted image from the pizza base was lost. I only stamped this on to the surface once as it was immediately obvious that the yellow ochre paint was not enough to overpower the blue used for the first print.
Overlapping the plate has worked well again with the edges of each print lost in the final image.
Plaster ice cubes
Printing from the plaster ice cubes had given promising results in stage three. I then extended that work in the following pieces.
Seven


White cotton fabric, winsor blue acrylic paint.
Eight


White cotton fabric, winsor blue and powder blue acrylic paint.
Nine


White cotton fabric, powder blue acrylic paint
All three of the above prints, seven, eight and nine, were produced using the plaster ice cubes produced in part three of this module.
Each cube was painted once with the acrylic paint and textile medium mixture and then either laid on to the fabric surface and the fabric drawn up around the cube (seven and eight) or rolled across the surface to give a group of four prints (nine), before being repainted and each method repeated.
Printing from the cubes was very tricky as they became very slippery once the paint had been applied to their surface but I am very pleased with the results I have produced.
These prints could only be made from the shape of the plaster cubes. They had flat and sharp corners, flat and rounded surfaces, rough and smooth areas and lines almost carved in to their surface. I could not have come up with the shapes produced in any other way than by printing these cubes directly.
I like the similar, yet random, shapes produced from each print of each cube but especially the areas where the groups of lines present on the surface of the cubes have left an unpainted area on the fabric surface.
I think these prints are the culmination of the work for this assignment as they have taken an item produced in part three, combined it with printing methods from part four and those methods have been extended here in part five.
Extra collagraph plates
Four extra collagraph plates were produced using hand stitched motifs from earlier in part five.
Ten


White cotton fabric, powder blue and winsor blue acrylic paint.
Each of the four plates was stitched by hand on to calico. The stitched samples were then placed on mountboard and sealed with dilute PVA glue.
These plates were produced using one, two or three threads stitched together to form the image or using wool couched to the calico.
All gave reasonable images when printed but individual stitches of each of the plates was visible in the final prints.
This was another test piece to establish if single stitches could be picked out from a hand stitched motif and from these prints is appear that they can be.
The positioning of the printed images is not very imaginative here. It shows the images clearly but is quite dull and regimented.
Stamps
Funky foam has been used to produce these stamps. I think this is meant to be a childs craft material but it is really good for producing stamps as the soft surface takes paint well and gives a uniform finish to the final images.
The foam is easy to draw on to and cut out and can easily produce positive and negative images when some care is take over cutting out the foam.
Eleven


White cotton fabric, powder blue, winsor blue, buff and pearl white acrylic paint.
I tried to apply these stamps in a random fashion but from viewing the whole fabric surface it is not as random as I had thought. The stamps have given very clear images as I had hoped.
Gutta
The gutta used in the test sample was quite old and had a very sticky consistency. A new, unopened, tube of gutta was much easier to handle and apply to the fabric. The gutta still took some time to dry though, over eight hours, so this is not a technique that can be completed quickly.
Twelve


White cotton fabric, powder blue, yellow ochre, pearl white and buff acrylic paint.
The acrylic paint was applied over the entire surface of the fabric once the gutta had dried. The paint was slightly diluted but did not water-log the fabric. Again a random application of paint was, I had thought, achieved but looking at the whole fabric surface that doesn’t appear to be the case.
The gutta was easy to wash out with cold water and some liquid fabric soap, but some of the paint was lost during the rinsing process. The pearl white paint became puffy and slimy and was rinsed away. This has left some areas of white fabric exposed, adding to the piece in my opinion, but the remaining paint has flattened out on a second drying and ironing .
Fabric cubes


Both the cubes cast in conventional plaster and plaster of Paris retained more detail that I had expected but also looked very soft.
By making a large amount of fabric cubes I was hoping to replicate the picture on the right above. The fabric cubes would be soft but with the right amount of stuffing would be able to hold their shape and form a pile or mass as above.


I have made fabric cubes from the fabric printed earlier in this section of work. Each cube is 6″ by 6.5″, this is in the same ratio as the plaster ice cubes.
I have taken a few photos of the original cubes to indicate the confirmation I was trying to obtain with the fabric equivalents. There is good similarity with how the plaster and fabric cubes have been arranged and fit together. The fabric cubes however are easier to pile so they have formed a much higher final arrangement.
With both the plaster and fabric cubes I think that making many more of them would give the installation I have been imagining for this work. There is not time or remaining fabric left to make the number of cubes I would like, also there would be nowhere to store these cubes.
I am pleased with what I have produced and think that the use of a limited number of coloured fabrics and acrylic paints brings the collection of cubes together well.
Below is a pdf document detailing each side of the cubes made. This shows the sections of fabric that were used for each cube.
Sorting
This was a good chance to review all of the work produced for the sample making in stage three.
The course notes suggest that samples should be viewed where ‘a small amount of development’ could be applied and then made in to a final prototype or maquette.
I have enjoyed printing on to fabric from the collagraph plates produced and am pleased to have got a reliable method to produce detailed, crisp prints. I feel that this should be taken in to the final part of this module.
After researching multiple objects produced for installations I would like to continue that in to this work by producing more stuffed fabric cubes. There would need to be at least 20 produced, this would reflect the number of plaster cubes that could be produced in one ice-cube bag when casting.
These two ideas can be combined by printing fabric using the collagraph plates, stamps, gutta resist and drawing directly on to fabric.
Sample 3 size fabric cubes with no extra stitching and under stuffed would be the best size to produce.
The collagraph plates produced in stage three could be reused to print larger pieces of fabric. They could also be overprinted with collagraph plates and plaster ice cubes.
Gutta could be used to mask areas of the printed surface before over printing or drawing directly on to the fabric.
This feels like a good extension of the work I have produced so far. It brings the collagraph prints and the research work in to installations made from many smaller items together well.
Recording outcomes
Collagraph on fabric
There is little written about collagraph printing on to fabric, and even less about printing from fabric based collagraph plates on to fabric. My work then became mostly trial and error. I had good success in printing collagraph plates on to paper so first started with that method to see if it would work on fabric.
When the fabric prints weren’t as crisp as I had hoped I revisited the paper prints I had produced to see if I could change any other variables in the printing method to improve the prints.
Adding more ink was possible using a sponge roller rather than a hard roller used for inking up lino plates.
Tighter weave fabrics have a smoother surface than loose woven cloth, including some samples using smoother fabric surfaces has given more detail.
Finally, the paper prints where damp paper had been used retained more detail than the dry paper prints. Also more ink was apparent on these damp prints.
Fabric was first sprayed with water to moisten the surface. This was then laid on the inked collagraph plates surface and pressed on to the plate using a rolling-pin. Paper was laid between the rolling-pin and the fabric to prevent any paint that worked its way through the fabric for getting on to the rolling-pin and being transferred to future prints.


Chine Colle
The tissue paper sample produced in stage two is one of my favourite samples. It is neat and well produced, but I wondered if this could be replicated using fabric.
The collagraph printing method above was used to ink and print the plate with fabric scraps being added to the plate with Pritt used to adhere the fabric scraps to the final fabric print.
Pritt is sufficient to temporarily attach the scraps to the final print but they have been stitched to the print too to ensure they do not move.
This is a very effective way to add an area of colour to the print made.

Overprinting
I had focused much of my visual research and sample prints in finding materials that would print well and a method via which these details could be transferred to fabric.
I had also only really tried to print plates in one colour. The final sample printed on to fabric was from two different collagraph plates, one printed, dried, and then another printed over the top of the first image.

This would be a good way to combine different plates, stamps and direct drawing on to a single print. Also each layer could be printed in different colours.
This final print is much more interesting that some of the single prints. There is plenty of scope here for further work, however, it would be wise to not try and combine every method and every plate together. Details may be lost and begin to look very messy.
Printing from plaster ice cubes
The plaster ice cubes are a unique shape, it would be difficult to produce these any other way, and they also give some very unique prints – as seen in stage two.


I enjoyed expanding the area over which these prints were made but the cubes were very difficult to hold on to while they were being printed from. Once they had been painted they were very slippery to hold on to, this left some small finger-tip prints on the finish prints.
Both methods used to print from these cubes has left some large areas of the fabric background uncoloured. These could form good ‘windows’ to view other prints behind.
Stamp
Funky foam is very easy to draw on to and cut out. It also has a very uniform surface so gives good prints when inked.
These are easy to make but look a little bit simple when compared to some of the collagraph plates.
They would be good to add single images on to previously printed surfaces.

Nozzle bottle
This is a good way to draw directly on to fabric. Dilute acrylic paint mixed with textile medium passes well through the nozzle but the occasional clump of paint can easily clog the nozzle. Pressing the bottle too hard can release too much paint in one go leaving too much paint on the surface. This can take some time to dry. Errors cannot be erased from the fabric using this method.

Gutta
Possibly the best surprise in my sample making was the washable gutta. It was very thick but there is a chance that it was quite old, having been in the back of a drawer for a while. A new tube might be easier to paint with.
The gutta was difficult to apply to the fabric and took some time to dry, roughly six hours. It was also easily covered with the paint used so I was unsure if it was going to work as I had hoped.
The paint was set using an iron (2 minutes, hottest setting) and the gutta washed out using a small amount of hand washing soap and cold water.
This could be used to mask printed areas to be retained with other plates printed on top.


Paper cubes
I had hoped to make larger scale card cubes but unfortunately my origami skills let me down. I couldn’t get the number of folds I wanted in to the surface of the card I was using. In order to make the cubes as I would have liked a very large piece of card would have been required.
Fabric cubes
The plaster cubes looked very soft once they were made so I thought I would try to make something similar to them out of fabric. I made a few samples of different sizes and stuffed them using toy filling.
Sample 1 was a bit too small, it looked like a ravioli rather than a cube.
Sample 2 was a more manageable size but was over stuffed. This meant that one of the valleys seen in the plaster cube was visible, the fabric had essentially been pushed out tight.
Sample 3 was filled with toy stuffing but much less than sample 2 and just enough to hold the two fabric layers apart and to allow some of the fabric to form folds on the side of the sample, similar to the lines seen on the plaster cubes.
Sample 4 was also underfilled but felt a little bit too large.

A further sample was made but small areas were raised and stitched to mimic the lines of the plaster cubes. Unfortunately the stitched areas, both straight stitch and whipped stitch, looked messy and pulled the cube a little bit out of shape.


Mirror box
Rather than making hundreds of plaster ice cubes I wondered if a mirror room, or in this case a scaled down mirror box, could be used to create the illusion of more cubes.
The box was very successful, but very difficult to photograph due to the reflective surfaces.
I do not think that I can take this idea any further. Increasing scale would incur much expense and would produce a very heavy item that would be difficult to make, store and ultimately post to either a tutor or for assessment.
I am pleased that I got this sample to function in the way that I thought it should.


Hexagrams
As I was making these I didn’t think very much of them. Revisiting them after producing the collagraph prints I feel that they work quite well.
There is a patchwork feel to each of the hexagrams produced which could be a good way to use up, or revive, poor prints. They are also a good example of overprinting and overdrawing.


Collagraph on to fabric
From the research made in Stage Two I have chosen to look more at printing collagraph plates and from my plaster ice cubes on to fabric. I have had good success printing on to paper using a press but that might not be the correct method for printing on to fabric from these surfaces.
Further plates were constructed from tile adhesive, this is waterproof once dry so no need to seal plate once the adhesive has cured, and also from fabric and stitched samples. The artwork used to inspire these plates is also included below.


These didn’t work so well on my first trial prints. Detail was captured from the plates on both fabric and paper but the prints weren’t as crisp as I would have liked. I reviewed the previous work I had produced using paper and a press and re-evaluated the method I had been using for these fabric prints.
Almost without exception the paper prints showed more details when the paper used was damp and had been printed using the press. I didn’t want to use the press as this would limit the size of print I could ultimately produce so I would need to find a different method to apply pressure to the plates to print on fabric.
I produced a second set of samples using damp fabric and used a rolling pin to apply pressure to the plate surface. These produced much more detailed and coloured prints.
Using damp fabric felt a little odd but it did allow the paint used to transfer to the fabric much better. Too much water on the fabric though and the colours started to run. The rolling pin was an easy solution to adding pressure to the plate when printing but needs to be monitored when in use as too much pressure can make the plate and fabric ‘jump’ from the printing surface.
Also adding more ink helped to improve these prints. Rather than using a hard roller a sponge roller was used to apply paint to the second set of samples.
In the samples below the first set of samples have been printed in a very dark blue, the second in indigo blue. More detail is seen in the second set of samples.


A fabric covered board was used under the plate to provide resistance against the plate when printing.
Samples were also produced using fabric instead of tissue for a chine colle effect. These were stuck to the fabric using pritt stick but were stitched to the finished sample once the glue had dried.

Also a sample where two plates are overprinted was produced. I think that this combination of prints will be useful for future work.

Printing from plaster ice cubes
A brief trial in part two involved folding paper and fabric around a plaster ice cube once it had been covered in acrylic paint. This left an interesting shape printed on the fabric as the 3D shape of the cube was transferred to the flat surface of the paper or fabric.
I chose to repeat the print from the cube across a larger piece of fabric. This was a little difficult as the cube had to be repainted before each print but also as the action of squeezing the fabric around the cube pushed the paint through to the reverse of the fabric. To prevent the paint transferring across the surface of the fabric a square of paper was placed underneath the fabric before it was formed around the cube.


A second print was taken from the cubes surface. This time the cube was painted and then rolled across the surface of a larger piece of fabric. A fabric covered board was placed under the fabric to allow the printing surface to form slightly around the cube. This was difficult to control as the cube became very slippery when painted. Groups of four shapes were printed before repainting the cube.


Other methods of adding pattern to fabric
Stamp
Funky foam was used to create a series of stamps based on some of the drawings produced previously. The foam gives a very uniform surface to print from and is easy to draw on to and cut out. The shapes were stuck to a mountboard backing using double-sided tape. The unused sections of the double-sided tape, not covered with funky foam, were made less sticky by adding talc.


Nozzle bottle
A small bottle with a nozzle was used to draw directly on to fabric. Acrylic paint and textile medium was diluted to a milk-like consistency. This was an effective method to draw on to fabric but does need some care as occasionally small clumps of paint can clog the bottle if the nozzle is very thin, also if the bottle is pressed too hard too much paint is released on to the fabric.

Gutta
I have used wax resists in my drawing work and wanted a relatively simple way to reproduce that effect on fabric.
I could have used batik but the wax in that method is difficult to remove. I chose instead to use water-based gutta. This is usually added to fabric from the nozzle bottle but I chose to squeeze the contents of the bottle out and paint it on to the fabric using a brush. This resulted in some areas that were not completely covered but has overall given a good resist to the dilute paint applied to the fabric.


For the final section of this part of the course a prototype or maquette is to be made. I still have no clear idea of what this might be but from my research I chose to focus on installations where many small items were produced and presented together.
From this research I have produced the following trial items which could be extended further later in the module.
Make paper cubes – folded card
I hoped that I could fold card to make a shape similar to the plaster ice cubes. Seems my origami skills aren’t advanced enough for that. This really didn’t take off at all so I have not continued any further with this idea.
Make fabric cubes
The plaster of Paris ice cubes produced in Part Three of the course were obviously hard due to the material used to cast them but when looking at the cubes they have a very soft quality, looking like little pillows.
I have produced a few fabric cubes in different sizes, stuffed with toy filling, to try and replicate the plaster cubes. Under-stuffing the cubes gave a similar appearance to the plaster casted cubes.
I tried to add a few lines to the fabric cubes but these looked a bit too obvious and a little messy.
Mirror box
An interesting way to make a few items look like many more. The box has been constructed using mirror tiles and duck tape and was then filled with plaster of paris cubes. The reflection of the cubes in the mirrored surfaces gave the impression of multiple cubes being present.
This was very difficult to photograph due to the shiny surfaces.


Hexagrams
Photocopies of previous prints were used to prepare these hexagram pictures. Each print was cut into smaller pieces and then coloured and drawn into.
This felt like producing a paper patchwork. Would be a good way to use up less successful prints or combining stamps and prints.
Throughout this work acrylic paint and textile medium has been used.
Visual/practical development
There is much work posted here that is both visual research and sample. They have been categorised as research for now but may also crop up in Stage Three – Samples later on.
Draw from theme/aesthetic
My favourite items produced in the module so far were the plaster of Paris ‘ice’ cubes. I chose to look at these more closely and produced the drawings below. I particularly like the images where the three-dimensional cube is flattened and the valleys in its surface depicted as lines.


Use ‘ice’ cubes to find colour palette
There were few coloured drawings in the work I had produced so far that could have been used to devise a colour palette. There were a few however that had been made in Part Two with diluted Quink ink.
I chose one of these images and used Adobe CC Color (https://color.adobe.com/) to obtain a series of possible ranges of colours that could be used for this work. These are shown below.
A selection of these colours were used in the drawing work produced from the ice cubes.
Printing from non-standard surfaces such as air drying clay, ceramic, plaster, fabric etc.
Collagrapah printing requires only that the material or items used to print from have a surface that can hold ink.
After making the air-drying clay tiles earlier in the module I wondered if they could be printed from. While testing this I also used one of the cast plaster samples from part three.
Air drying clay comes under many brands I tested FIMO, DAS and Sculpy brands. FIMO and DAS were true air drying clays and needed at least 48hrs to harden completely. Sculpy was set by baking in a domestic oven.


All forms of clay held the ink well, but due to their uniform surface there was very little variation in to depth of tone produced on each print. DAS and FIMO clays accepted ink well and the block print ink used dried quickly on its surface. The Sculpy clay however produed some good prints but the ink has not dried on the surface, even several weeks later. This may be due to a higher oil content in this clay.
These clays were quite sticky when rolling them out on a work surface. It was very easy to stamp the surface with the ice cubes but it was then difficult to remove the sheet of clay from the table in one piece. Perhaps too delicate to make a plate from or would need more careful handling.


The plaster cast used was quite thin at the edge and some came away while printing. The thicker areas near the centre of the piece felt more sturdy so plaster might be a viable material to make a printing plate from, however it should only be printed by hand.


The plaster ‘ice’ cubes were quite tricky to print from. The block printing ink and then acrylic paint made the cube very slippery and difficult to move around the paper. Eventually I produced some interesting prints including a vaguely tessellating pattern. Perhaps this could be repeated on a larger scale.
Create ‘plates’ based on these drawings and contextual research
Contextual research illustrated that printing from fabric was not a common method. There are few artists that have produced small runs of prints but these were mostly on to paper for use in Artists Books. Collagraph printing on to fabric also seems to be very rare.
I plan to use the drawings produced above in the plates created in stage three samples.
Combining materials on collagraph plates
I began by collecting as many fabrics and materials as I could find with different surface properties. One reference suggested that printing from quilts was difficult due to the wadding and layers of fabric creating a surface that was too spongy to make a good print.
I set out to produce a series of plates that combined the fabrics I had found. These were stitched on to fabric backgrounds, some with wadding, some without, double layers of calico and some with only single fabric layer as a background.
I also produced a plate using machine stitched lines, a selection of other materials such as polyfilla, glitter and plastic net and added some hand stitching to some plates to see how these would print.
These were all sealed on to mountboard to give a surface with sufficient resistance to print against.
Each plate was printed on to dry and damp paper using hand pressure, a roller press and a foot press. The foot press was produced using two old cupboard shelves. the plate and paper were placed between the two shelves on the floor and then the shelves stood on. The pressure exerted by the weight of the person on the shelves made the print. This method might be a good way to print larger collagraph plates, as the press I have is only A4 in size.
Below are the plates made and some of the prints produced. Individual stitches have been captured on some of the prints, along with the weave of many of the fabrics used.


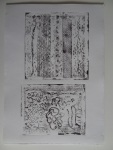


These prints have formed a good reference for the image that might be produced from different fabric samples.
Printing on to fabric – technical details but also different methods
As part of this work I looked at how to not only print on fabric but how to draw on to it too. It may prove useful in future samples to have a method to add less uniform lines to a surface, something that might be difficult to do with printing only.
This work was best investigated in a very practical way. Below are the pages from the book produced that contain the samples made.


I particularly liked the chine colle sample. I thought that this might be a bit tricky to achieve but it was much easier than I thought. This method did not translate exactly to the fabric sample but I feel that there is something that can be worked with here.
I also enjoyed the screen printing samples, the possibility of creating exactly the same motif over and over again may be useful in future samples.
Initial research
As before all of my initial research is in a series of A5 sketchbooks. I feel that this is a good way to store the information I find and keep it for later use. Each book has been scanned and the appropriate pages presented below.
Installations where large numbers of small items have been used.


Examples of contemporary drawing
This is a very open-ended subject so it was important to narrow down the sources used and what exactly I was trying to determine from this line of research. I chose to look at different drawing techniques and materials to extend my own drawing work.


Stitched collagraph examples, if any.


The majority of these samples are more collagraph prints from fabric pieces and not necessarily from specially sewn items. They are also printed on to paper and not fabric. If I choose to pursue collagraph on to fabric there will be much trial and error in finding a suitable method as there is very little directly written about the subject.
Choose a theme or aesthetic to derive pattern, colour, structure and texture information.
The plaster of Paris ‘ice’ cubes are still my favourite samples from this module of work. I will try to use these in the visual research exercises.
Printing on to fabric
It is all too easy to print reams and reams of paper from internet sites about printing methods and media. I have tried to retain information only on the methods that I might like to use or that I already have the materials for.
These are not listed here as they will form the basis of the visual research produced in the next step of this stage of work.
There were also a few timely blog posts on the OCA website.
The question of development (https://weareoca.com/textiles/the-question-of-development/) accessed 13.02.17 and
Nina O’Connor (https://weareoca.com/student-work/nina-o-connor/ accessed 25.01.17
These posts made some very important points in that the development of an idea did not mean having a fixed idea and working towards it but taking a more open-minded approach. Researching many different avenues before fixing on a few ideas to pursue and eventually producing a series of samples that may or may not be a finished item. Quite refreshing.
Part Five – Stage Two
After reviewing my work and noting a few areas for research I then forwarded my ideas to my tutor. As usual her notes were both sensible and straight forward. I was still concerned about the final piece as I have no idea what I’ll eventually produce but I have put that to one side to focus on the research.
It transpired that my ideas really split in to two sections, initial research and visual/practical development.
Initial research
Installations where large numbers of small items have been used.
Examples of contemporary drawing
Stitched collagraph examples, if any.
Choose a theme or aesthetic to derive pattern, colour, structure and texture information.
Visual/practical development
Draw from theme/aesthetic
Create ‘plates’ based on these drawings and contextual research
Combining materials on collagraph plates
Printing from non-standard surfaces such as airdrying clay, ceramic, plaster, fabric etc.
Printing on to fabric – technical details but also different methods
Use ‘ice’ cubes to find colour palette
A new learning log for OCA Textiles
Further explorations of colour, shape, and texture in south-west France
Welcome to your new home on WordPress.com
A Textiles Vocabulary
Rachael Greenland Learning Log
An OCA Learning Log by Nicola Dawn
reflections on stitch: a learning log
Textile and Mixed Media Artist
Colour, shape and texture in south-west France
